
Troubleshooting FAQs
This FAQ is intended as a guide for solving common analyzer problems. It is not a comprehensive troubleshooting guide for every problem that may arise during analyzer operation.
Analyzer does not start
Q: What should I do if my analyzer will not power on?
A: Check the following:
- Power supply: Check the power adapter brick for a green LED. If the LED is dark, make sure the adapter is plugged into a functioning power outlet.
- Power button: Depress the power button as far as possible until a blue light comes on.
- Internal Battery connection: For Pico and Strato analyzers, analyzers are shipped with the battery disconnected. Follow instructions in the quick start guide in the user manual to ensure the internal battery is connected.
- Open the case and inspect all electrical connections as specified in the table below. Use appropriate ESD precautions when handling the instrument to protect sensitive electronic components.
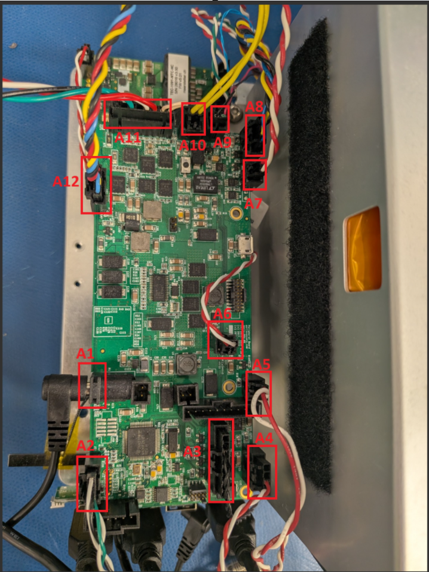
| ID | Connection / Function | Ultra | Pico | Strato | UltraB |
| A1 | Power barrel | ✓ | ✓ | ✓ | ✓ |
| A2 | Power button | ✓ | ✓ | ✓ | ✓ |
| A3 | Switching valve | ✓ | ✓ | ✓ | |
| A4 | Sensorboard power | ✓ | ✓ | ✓ | ✓ |
| A5 | Heater walls power | ✓ | ✓ | ||
| A6 | Meerstetter power | ✓ | ✓ | ||
| A7 | 12 V case fan | ✓ | ✓ | ✓ | ✓ |
| A8 | Pump connector | ✓ | ✓ | ✓ | ✓ |
| A9 | 5 V fan | ✓ | ✓ | ✓ | ✓ |
| A10 | Battery thermistor connector | ✓ | ✓ | ||
| A11 | Battery connector | ✓ | ✓ | ✓ | ✓ |
| A12 | Battery board UART connector | ✓ |
- Battery State of Charge: If you have not used your analyzer for a long period of time, it is possible the battery’s state of charge has dropped below acceptable levels. If the analyzer is equipped with a battery, the battery may be severely drained. Review Section 3.3 of the User Manual, “Operating the Analyzer Without the Battery” and follow the suggested steps.
- Support: If the problem persists, reach out to support@aerissensors.zendesk.com for further support.
Inaudible pump
Q: Why can't I hear the pump after the analyzer's power light has been blinking?
A: The analyzer may still be warming up, or a connection may have come loose.
Try the following:
- If the power button is blinking, this means the analyzer is powering up. If the power button continues to blink and the analyzer does not initialize after 5 minutes, contact Aeris.
- While the instrument is off, check the internal USB hub wires for loose connections and disconnect/reconnect the USBs. Once the USBs have been reconnected, power on the analyzer and allow 5 minutes for powering up.
- Although uncommon, the pump may be malfunctioning. Reach out to support@aerissensors.zendesk.com for further support.
GUI connectivity issues
Q: What should I do if I cannot access the analyzer’s GUI?
A: Several conditions may prevent access:
- Wi-Fi connection: The Wi-Fi connection may not have been established.
- Analyzer startup: Allow the analyzer to start. Once the pump starts, the GUI should be available.
- Wi-Fi service: Try rebooting the analyzer once. The Wi-Fi service may be in an error state.
- Ethernet: Try accessing the analyzer through Ethernet, as described in Section 3.1, “Ethernet setup.”
- Too many Wi-Fi access points: There may be too many Wi-Fi access points in the area. Move the analyzer and try again.
Battery Issues
Q: What should I check if the analyzer battery is not charging?
A: Check the following:
- Power supply: Check the power adapter brick for a green LED. If the LED is dark, make sure the adapter is plugged into a functioning power outlet.
- Wire connections: With the instrument powered off and the power adapter disconnected, unplug the battery connector. Wait 10 seconds, then reconnect the battery connector and power adapter. Attempt to power on the analyzer.
- Charging while running: If you are charging the battery while using the analyzer, the battery will charge more slowly.
- Battery life: Lithium-ion battery performance degrades after multiple years of use. Reach out to support@aerissensors.zendesk.com if you suspect your battery needs replacement.
USB device issues
Q: What should I do when pairing a USB device results in “No new USB device detected”?
A: Check the following:
- Device already paired: If the device is already paired, enable the device on the HW control tab, then reboot the analyzer.
- Device not powered or damaged: If the device is not powered, try another device if possible. Enable the device on the HW control tab, then reboot the analyzer.
- GPS indicator: Check the GPS indicator:
- No red light: No power is going to the GPS. Check the connections.
- Solid red light: GPS is triangulating.
- Blinking red light: GPS is functional.
Negative or errant concentrations
Q: Why is my analyzer reading negative or errant concentrations?
A: This is typically caused by non-optimal initial guesses which lead to the fitting algorithm losing track of the absorption peaks.
- When the fitting algorithm slips, the red fit lines will no longer align with the blue experimental data. This can be confirmed by reviewing the Normalized Spectrum The screenshots below illustrate examples of a good fit and a poor fit.
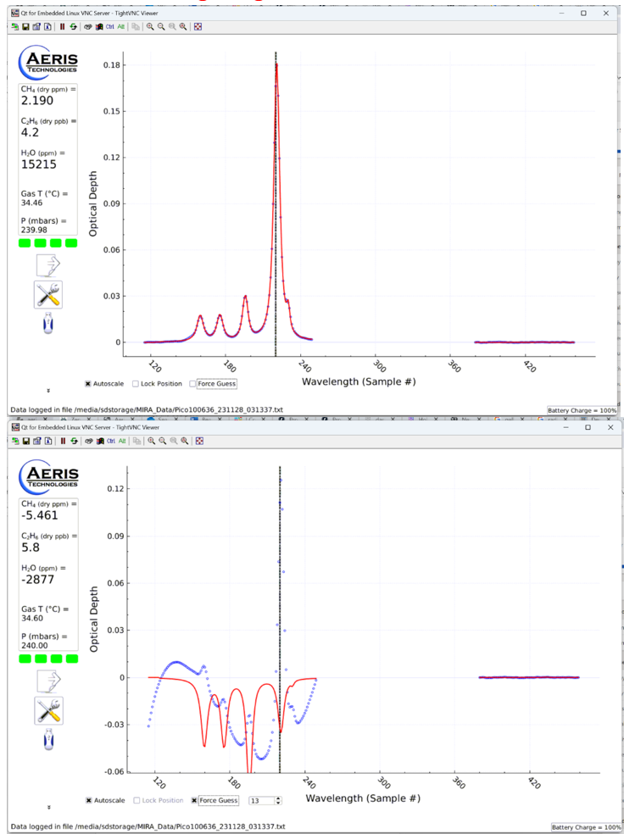
- If the analyzer has just started, it will need warm-up time. Allow the analyzer to run for approximately 5 minutes, then check again. Often entering the settings menu and hitting “ok” will restore the fit.
- Refer to Section 2.5.1, “Force guess example.”
- The laser may be damaged or there could be some form of optical contamination. Contact Aeris support if the issue is reoccurring or cannot be resolved through the steps above.
Measurements are noisy
Q: What should I check if my measurements are noisy?
A: Check the following
- Temperature control: On the VNC, if the base TEC readings on the diagnostics screen are reading zero or a negative value, the analyzer may have started too cold or too hot. The acceptable range is approximately 50–90°F.
- If it is too cold, reboot the analyzer after 5 minutes.
- If it is too hot, let the analyzer cool before rebooting.
- Pressure control: If pressure is fluctuating wildly, check whether the pressure is 1 mbar or more above or below the set point. If so, check the tubing and filters for kinks and blockages.
- Optical contamination: On the diagnostics screen, if the ramp amplitude is around or less than 1, there may be contamination within the optical cell. Contact Aeris support.
Inlets are not switching
Q: What should I do if the inlets are not switching?
A: Check the following:
- Settings not saved: Be sure to tap Apply and then OK to apply port management changes. Exiting the window without tapping OK will discard the changes from being saved. Please refer to the screenshot below.
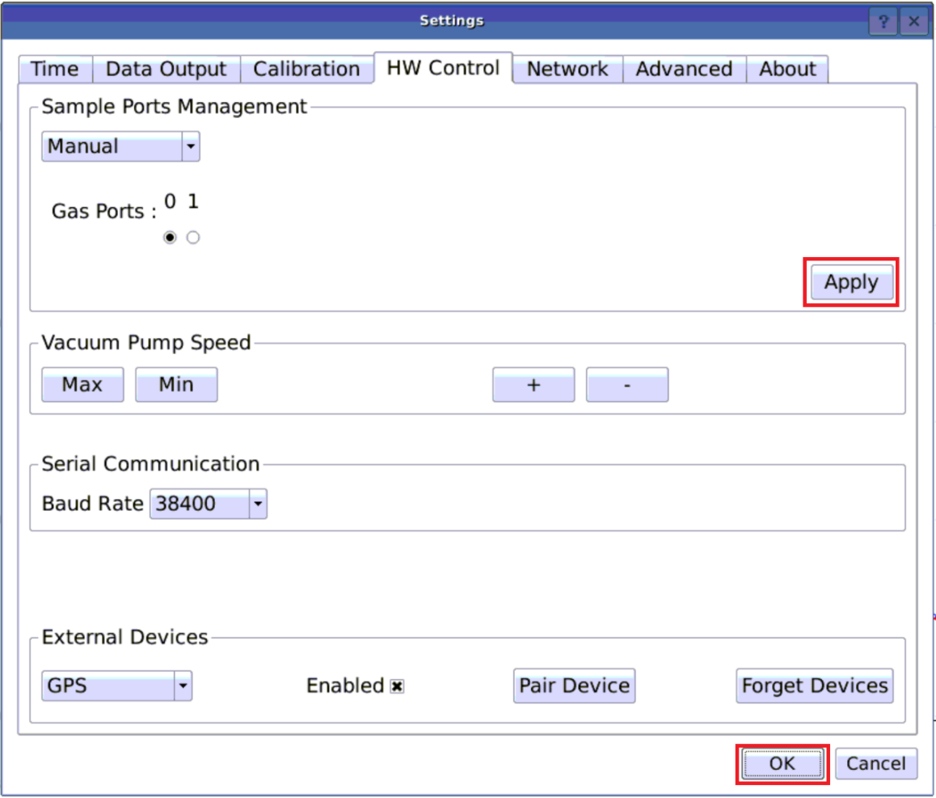
- Clogged valves: After prolonged use, it is possible that the valves will be clogged.
Analyzer is taking too long to respond to ambient or calibration gas changes
Q: Why is the analyzer taking too long to respond to ambient or calibration gas changes?
A: The gas line may be running at too low a pressure.
Try the following:
- The analyzer may be equipped with a slow-flow valve.
- Ensure calibration gas outputs are at least 1 psi.
- Increase pump speed.
- Make sure the inlet line is fully inserted into the inlet port on the enclosure.
Optical Contamination
Q: My analyzer shows signs of optical contamination, what can be done?
A: Optical contamination (visible as large background fringe, low ramp amplitude, or noisy spectra) typically requires the instrument to be returned to Aeris for a full optical cell rebuild.
- Contact Aeris support
Maintenance
Q. What type of maintenance is required for my Aeris device?
A. The filters and pump are the only components of the analyzer that are expected to require routine service or replacement.
The pump is rated for 10,000 hours of operation, which is equivalent to approximately 14 months of continuous 24/7 operation. As a general guideline, the internal filters should be replaced at the same interval as the pump.
For analyzers operating in particularly dusty or contaminated environments, more frequent filter replacement is recommended. In these conditions, the internal filters should be replaced twice per year to help maintain proper analyzer performance.
- All replacement parts should be purchased directly through Aeris Technologies.
How do I get additional support?
Q: Who should I contact if these troubleshooting steps do not resolve the problem?
A: Contact Aeris Support with the unit’s serial number and a detailed description of the issue. If the issue cannot be resolved remotely, Aeris Support will issue an RMA number and assist with the return shipping and logistics.
- Support email: support@aerissensors.zendesk.com
- Support phone number: +1 (510)-989-4614